So as part of a simple train puzzle video game I was building, I had a need to extrude a polygon along a line: specifically, I needed to extrude a “rail” shape along a path:
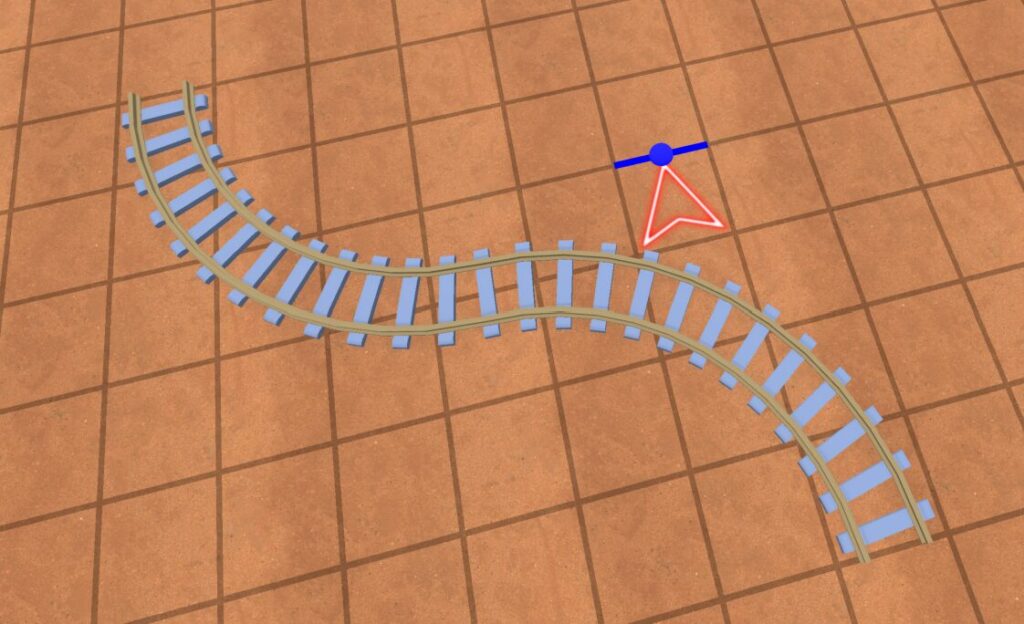
Extruded rail polygon
However, I had never worked with hand-constructing polygons before; Godot did not have functionality to do this at runtime. So I decided to write it myself.
My starting inspiration was the CSGPolygon shape in godot: this was a tool used to extrude polygons along a line in the Godot editor; it wasn’t meant to work at runtime however, because it was simply too slow due to the all the indirection that happens between GDScript and C++.
So, with that, I went down a path of writing the code myself – first in GDScript, to make sure it works, and then I ported it to C++.
Something I want to note is that I used ChatGPT to port my code from GDScript to C++ and it worked flawlessly on the first try. I continue to be impressed by LLMs ability to translate code from one language to another – I would highly highly recommend using LLMs for any code translation and assume they’ll get it mostly right.
My starting point for writing my code was essentially to copy of subset of what they were doing in CSGPolygon. On the topic of LLMs, I asked ChatGPT to analyze a section of the CSGPolygon code in godot that was relevant to my use case: CSGPolygon
Sidenote: Using LLMs to understand code quickly
I think this is one of the places again where LLMs shine: understanding large pieces of code quickly. LLMs can summarize what a few hundred to few thousands of lines of code are doing at a high-level. Think of it as spark notes: yeah you can read the book yourself, but if you’re just trying to get the gist of what’s going on, the spark notes will do just fine, and you can do it in a fraction of the time.
And that’s exactly what LLMs do great; I can read the code, in an unfamiliar language(C++), in an unfamiliar codebase(godot), in an unfamiliar domain(videogames), and understand it after a few hours of looking; or I can have chat gpt summarize for me in a few seconds and have my understanding in a few minutes. It’s an understanding accelerator.
Extruding polygons
So in anycase, I uploaded the whole file for CSGPolygon to chatGPT, and asked it to analyze what’s going on. A snippet of that response is below:
- Fetches the curve from the Path3D node.
- Iterates a certain number of times along the path to create “rings” of the polygon shape.
- For each step, transforms the 2D polygon points into 3D using a “facing” transform that depends on the current slice along the path.
- Connects consecutive rings with quads that form the extruded “walls.”
Hmm, creating “rings”. Interesting, this isn’t an idea I have heard of or considered. After deepening my understanding and playing around with the code and relearning way too much matrix multiplication, I was able to figure it out. So in my own words, here’s how it works:
Imagine you have a 2D polygon. And imagine you want to extend the “face” of that polygon along a line. So for example, a simple square, extended along a line that goes through the center of a square, would turn into a rectangular prism(pictured below).
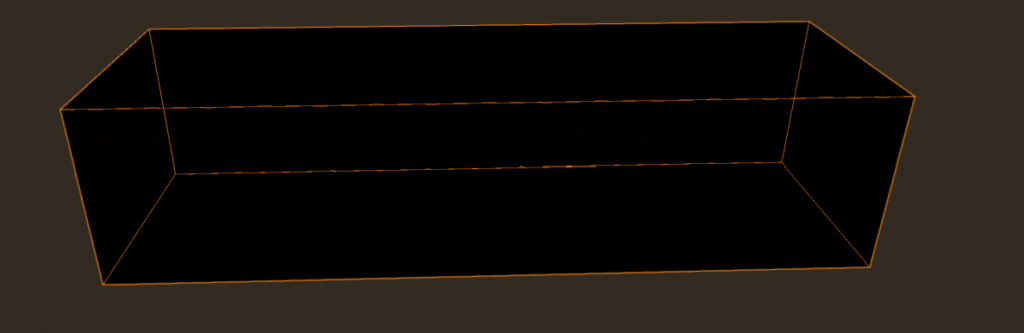
Our rectangular prism, extended from a square.
Now, in game development, all objects are made up of triangles. So we need to split this rectangular prism into triangles.
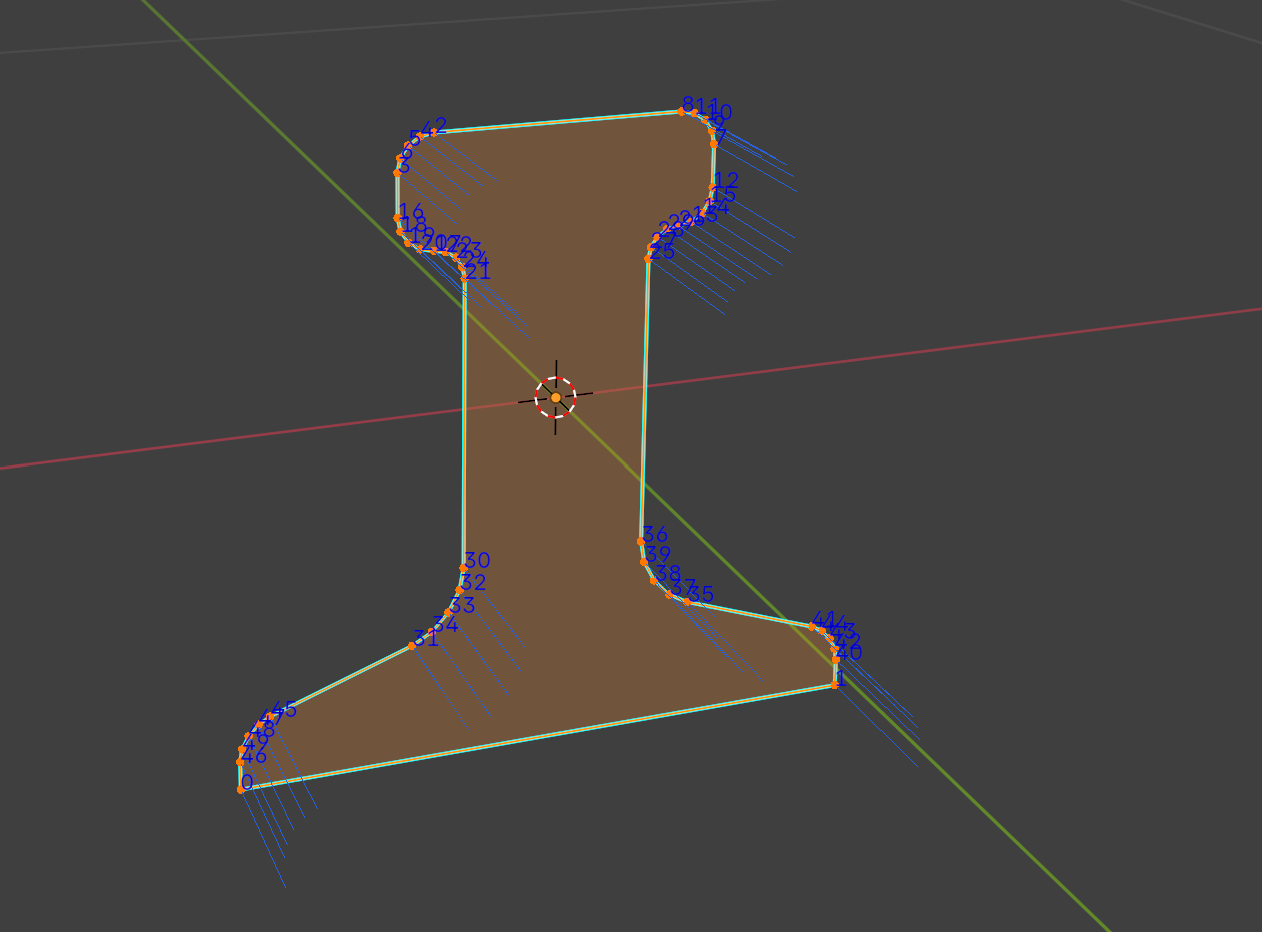
Also realize the “polygon” we might want to extend might not be a square. It might look something like this, a railroad rail:

So how do we extrude something like this?
Well you’ll need 2 things to start:
- A 2D polygon, specified by a list of points in clockwise or counterclockwise fashion
- A list of points specifying the path you want to extrude the polygon along
Going back to our prism, imagine it is a square extruded along a straight line made up of 3 points going from left to right. Imagine the triangles look something like below. The red dots indicate points of the rectangle, and I’ve drawn the 4 initial triangles.
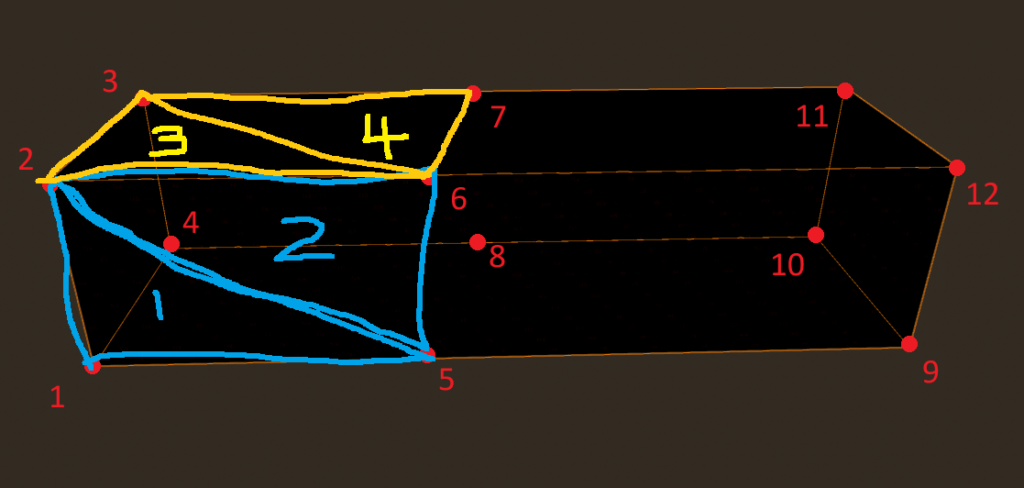
The general idea is this: Take the polygon shape, and “push” it along whatever path you have(in this case, our path would be be a straight line with 3 points that go from left to right). Place a “face” at each point in our line. So in this example, we would have 3 faces: one at points 1,2,3,4, one at 6,7,8,9 and one at 9,10,11,12.
To determine where to place the points for each of your faces, you do the following:
- Place the original face at the origin
- For each point along the path
- Create a copy of the face to be centered on that point on the line
- Have the face “point in” the direction of a vector that is decided by the previous point in the line and next point in the line.
This will essentially transform each “point” in each face to be centered correctly along the path, and facing in the correct direction on the path.
Once you’ve placed your faces in space, connect the faces together with triangles. To do this, go counterclockwise around the face, and connect once face to the next using “rings” of triangles. You connect the rings by using 1 set of adjacent points from each face to form the triangles. Let’s work through an example. In the image above, we’d start with points 1,2 on the first face and 5,6 on the second face.
We’d break this “polygon” into 2 triangles: 1,2,5 and 2,5,6. Then we’d “rotate” counterclockwise by 1 point: now we have 2,3 on our first face, and 6,7 on our second face. We break this “polygon” into 2 triangles again: 2,3,6 and 3,6,7. Keep rotating around your prism until you get back to your original points: 1,2. Then you’re done! You’ve essentially connected a “ring” around the faces 1,2,3,4 and 5,6,7,8.
Keep repeating this process with each set of faces until you get to the end of your extruded polygon, and you’ve created a “ring” around your whole path using the shape of your polygon.
The last thing you need to do is to “fill in” your two end caps with triangles.Typically, there are functions out there in your game engine of choice that takes in a polygon(with points ordered clockwise or counterclockwise), and creates triangles from it, or gives you the points to triangulate it. This is a well-studied algorithm in videogames, so don’t reinvent the wheel here. In godot that’s triangulate_polygon. So simply use that and you’re done constructing the mesh for your project!
Then, you’ll need to calculate the normals and the UVs for each point; that stuff is less interested and won’t be outlined in this blog post(you can see an example in the code linked below).
For a complete code implementation in C++ for godot that does the extrusion, as well as the end caps and UVs and normals, you can see it here:
https://github.com/Kevin-Jonaitis/JIT-Just-In-Train/blob/main/cpp/mesh_generator.cpp
This code essentially takes in an array of clockwise points in a polygon, a path specified by a list of 3d points, and a pointer to an arrayMesh object to hold all the data, and returns the arrayMesh filled with the extruded polygon.
That’s it! I hope you learned a cool and useful idea today 🙂
Bonus: Straight line optimization
One optimization I did in my game that was really helpful, was that if the points along a path are in a “straight line”, or deviate less than 5 degrees in angle, we “skip” placing a face along those points; this can make it so if you’re extruding a polygon along a very far distance that’s straight, we don’t create lots of unnecessary triangles: we just create at places where the angle change. This can save a LOT of computation. In our prism example above for example, we’d skip placing the middle face 5,6,7,8 since the points are inline with the previous and next face.